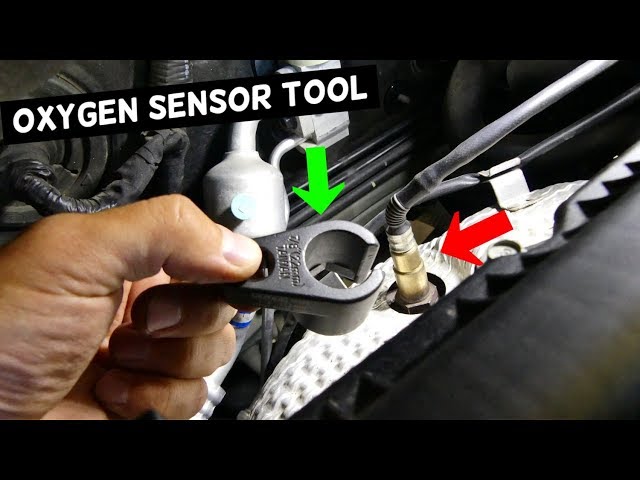
Have you ever experienced an engine light warning on your car dashboard? If yes, then you know how frustrating it can be. One of the main culprits that trigger this warning is a faulty oxygen (O2) sensor. This component plays a crucial role in ensuring your car’s engine runs efficiently and emits less harmful emissions.
To replace an O2 sensor, you need to remove the old one from its place first. In this article, we’ll guide you through the process of using an O2 sensor tool removal like a pro.
First Things First: Identify the Location of Your O2 Sensor
Before you start removing your O2 sensor, you need to locate its position first. The location varies depending on your car model and make. Generally, O2 sensors are located either before or after the catalytic converter.
Once you’ve identified its location, it’s time to gather all the necessary tools and equipment for the job.
Tools You Will Need:
– Safety goggles
– Gloves
– Jack stands
– Wrench or socket set with extension bar
– Penetrating oil (optional)
– O2 sensor removal tool
Step-by-Step Guide on How to Use an O2 Sensor Tool Removal
Now that you’ve got everything ready let’s dive into the actual process of removing an O2 sensor.
Step 1: Prepare Your Vehicle
The first step is always safety. Make sure your car is parked in a safe and levelled area. Turn off the ignition and let the engine cool down if it was running before. Wear gloves and safety goggles before proceeding.
Step 2: Raise Your Vehicle Using Jack Stands
Next, raise your vehicle using jack stands. Locate the jacking points under your vehicle, which are usually located near each wheel. Place the jack stands securely under these points and lower your car onto the stands. Make sure your car is stable and levelled.
Step 3: Locate and Remove the O2 Sensor
Now that your car is elevated, locate the O2 sensor you want to remove. Use your wrench or socket set to loosen the sensor from its position. If the sensor seems stuck, use some penetrating oil to loosen it up.
Step 4: Use an O2 Sensor Removal Tool
Once you’ve loosened the sensor, it’s time to use your O2 sensor removal tool. This tool has a special design that allows you to grip the sensor firmly and twist it out of its position. Insert the tool onto the sensor and turn it counter-clockwise until it comes off.
Step 5: Inspect Your Old O2 Sensor
Inspect your old O2 sensor for any signs of damage or wear. If you notice any abnormalities, replace it with a new one. It’s always advisable to replace both pre-catalytic converter and post-catalytic converter sensors at once.
Step 6: Install Your New O2 Sensor
Once you’ve removed your old O2 sensor, it’s time to install a new one. Follow the reverse order of what you did earlier. Insert the new sensor into its position by turning it clockwise using your hands first before tightening it with a wrench or socket set.
Step 7: Lower Your Vehicle
After installing your new O2 sensor, lower your vehicle from jack stands carefully. Start your engine and check for any warning lights on your dashboard. If everything looks good, congratulations! You’ve successfully replaced your car’s O2 sensor.
In Conclusion
Removing an O2 sensor using a specialized tool is not rocket science. With this guide, we hope we have made it easier for you to do it like a pro. Remember always to prioritize safety when working under a raised vehicle and follow all necessary precautions.
If you’re unsure about anything, consult a professional mechanic for assistance. Happy DIY-ing!
References:
– WikiHow. (2021). How to Replace an Oxygen Sensor. Retrieved from https://www.wikihow.com/Replace-an-Oxygen-Sensor
– AutoZone. (2021). How to Install an Oxygen Sensor. Retrieved from https://www.autozone.com/diy/sensors/how-to-install-an-oxygen-sensor


