Equalizer Tools: The Ultimate Guide to Mastering Your Audio
Equalizer tools are essential for anyone working with audio. Whether you’re a musician, producer, or sound engineer, an equalizer tool allows you to manipulate the frequencies of your audio and create a more balanced, polished sound. In this guide, we’ll take a deep dive into the world of equalizers, exploring what they are, how they work, and how you can use them to take your audio to the next level.
What is an Equalizer?
An equalizer (EQ) is a device that allows you to adjust the balance between different frequencies in your audio. It works by dividing the frequency spectrum of your audio into different bands, each of which can be boosted or cut by a certain amount. This allows you to shape the overall sound of your audio by emphasizing or de-emphasizing specific frequencies.
There are two main types of EQ: graphic and parametric. Graphic EQs feature a set number of fixed frequency bands that can be adjusted with sliders or knobs. Parametric EQs offer more control over the frequency bands and allow you to adjust the center frequency, bandwidth, and gain of each band individually.
Why Use an Equalizer?
Using an equalizer can greatly improve the quality of your audio recordings or mixes. By adjusting the levels of different frequencies, you can:
– Correct problems with imbalanced frequency response
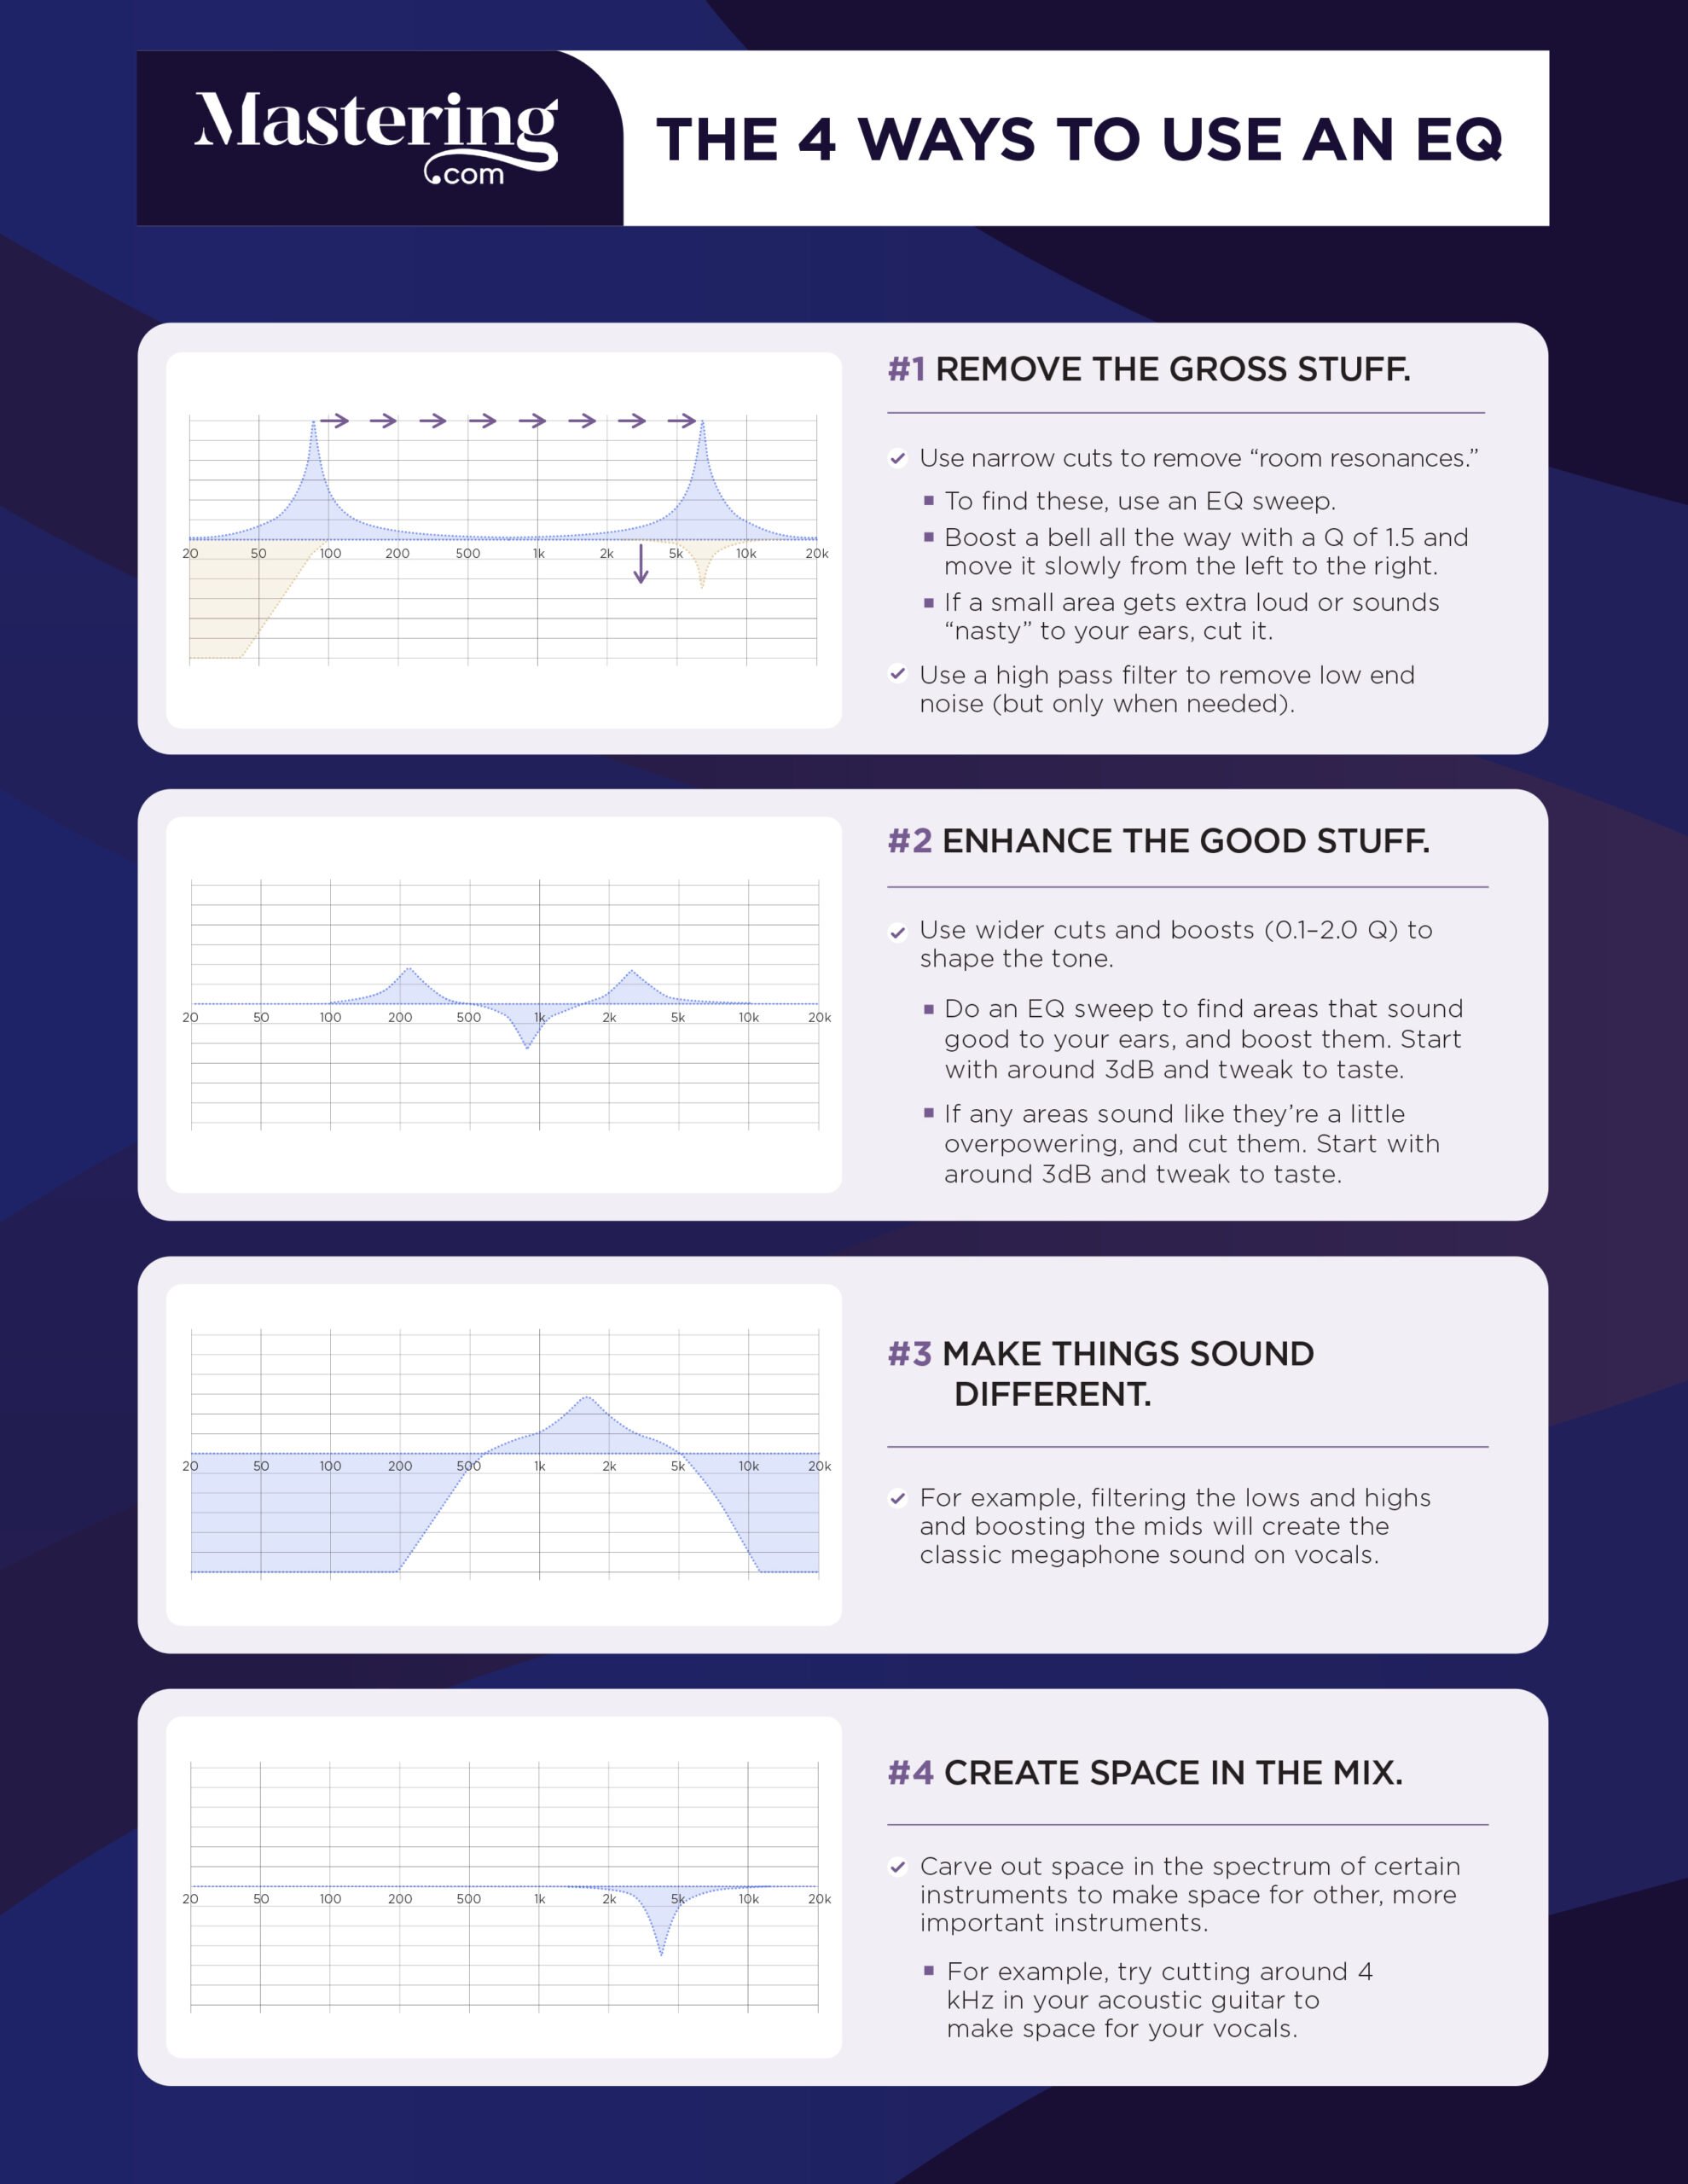
– Enhance certain elements of your mix (e.g., boosting the bass for a more powerful low end)
– Create space in your mix by reducing competing frequencies
– Remove unwanted noise or hum from your recording
– Improve clarity and definition in individual instruments or vocals
However, it’s important to note that using an equalizer should always be done with care and intentionality. Overuse or improper use can lead to a distorted or unnatural-sounding mix.
Understanding Frequency Bands
Before diving into how to use an equalizer, it’s important to have a basic understanding of frequency bands and how they relate to the sound spectrum. The sound spectrum is divided into different frequency ranges, with lower frequencies on the left and higher frequencies on the right:
20 Hz – 250 Hz: Sub-bass frequencies (low rumble)
250 Hz – 500 Hz: Bass frequencies (kick drums, bass guitars)
500 Hz – 2 kHz: Midrange frequencies (vocals, guitars, snare drums)
2 kHz – 4 kHz: Upper-midrange frequencies (cymbals, high-pitched instruments)
4 kHz – 6 kHz: Presence frequencies (vocals, snare drums)
6 kHz – 20 kHz: Brilliance frequencies (cymbals, hi-hats)
Different types of audio will have different frequency responses based on the instruments or voices involved. Understanding which frequencies correspond to certain sounds will help you identify problem areas in your mix and make more targeted adjustments with your EQ.
Using an Equalizer Tool
Now that you understand what an equalizer is and why it’s important, let’s dive into how to use one effectively. Here are some steps you can take to get started:
1. Listen to Your Audio
Before making any adjustments with your EQ, take the time to listen closely to your audio and identify any problem areas. Does the bass sound muddy? Are vocals getting lost in the mix? Once you’ve identified specific issues, you can start thinking about which frequency bands might need adjustment.
2. Start with Small Adjustments
When making adjustments with your EQ, it’s important not to go overboard. Small tweaks can often have a big impact on the overall sound of your mix. Start by making small adjustments of no more than ±3 dB per band.
3. Use a Spectrum Analyzer
A spectrum analyzer is a helpful tool that displays a visual representation of the frequency spectrum of your audio. This can help you identify problem areas and make more targeted adjustments with your EQ.
4. Cut Before Boosting
When making adjustments with your EQ, it’s generally better to start by cutting frequencies rather than boosting them. Boosting a frequency that’s already prominent in your mix can lead to distortion or an unnatural sound. By cutting competing frequencies, you can create space for the ones you want to emphasize.
5. Be Careful with Low Frequencies
Low frequencies (below 100 Hz) can be particularly tricky to work with because they have a lot of energy and can easily overpower other elements in your mix. Be careful when making adjustments to these frequencies and make sure they’re balanced with the rest of your mix.
6. Use Multiple EQs
In some cases, using multiple EQs on different tracks or instruments can help you achieve a more balanced overall sound. For example, you might use one EQ to adjust the bass in a kick drum track and another EQ to adjust the snare drum.
7. Trust Your Ears
Ultimately, the most important tool when working with an equalizer is your ears. Listen closely to your audio and trust your instincts about what sounds best. Don’t be afraid to experiment and try different things until you find the perfect balance.
Conclusion
Equalizer tools are essential for anyone working with audio, allowing you to shape the overall sound of your recordings or mixes by adjusting the levels of different frequency bands. Understanding how to use an equalizer effectively requires a basic understanding of frequency bands, careful listening, and small, intentional adjustments. With practice and experimentation, you can master this powerful tool and take your audio to new heights.
References:
– “Equalization (audio)” Wikipedia, https://en.wikipedia.org/wiki/Equalization_(audio)
– “How To Use An Equalizer: The Ultimate Guide” LANDR Blog, https://blog.landr.com/how-to-use-equalizer/
– “The Ultimate Guide to EQ” Sound On Sound, https://www.soundonsound.com/techniques/ultimate-guide-eq


