Chitarra Tool: The Ultimate Guide to Crafting Perfect Pasta
Are you tired of mediocre pasta dishes that lack the traditional Italian touch? Look no further than the chitarra tool – an essential instrument for any pasta enthusiast. In this comprehensive guide, we’ll cover everything you need to know about using a chitarra tool to create perfect pasta every time.
What is a Chitarra Tool?
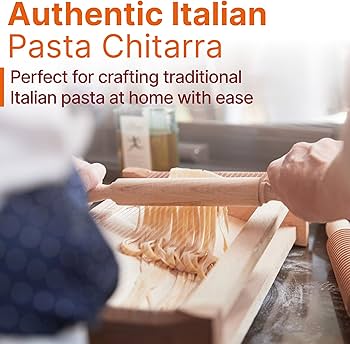
A chitarra tool, also known as a guitar cutter, is a traditional Italian kitchen utensil used for cutting fresh pasta. It consists of a wooden frame with parallel wires stretched across it. The wires are spaced evenly apart and used to cut long strands of pasta dough into square or rectangular shapes.
The word “chitarra” means guitar in Italian, and the tool gets its name from the way the wires resemble guitar strings. Historically, the chitarra tool was used in Abruzzo, Italy, but it has become popular among chefs worldwide due to its ability to produce consistent and uniform cuts of pasta.
Why Use a Chitarra Tool?
Using a chitarra tool can elevate your homemade pasta game by providing several benefits:
1. Consistency: Unlike hand-cutting methods, which can produce uneven results, a chitarra tool ensures that all pieces of pasta are cut to the same size and shape.
2. Texture: The wires on a chitarra tool create ridges along each strand of pasta, allowing sauces and toppings to adhere better and enhancing the overall flavor and texture of the dish.
3. Speed: Using a chitarra tool saves time compared to cutting by hand, making it an ideal choice for busy kitchens or home cooks who want to streamline their cooking process.
How to Use a Chitarra Tool
Now that we’ve covered why you should use a chitarra tool let’s dive into how to use one properly:
1. Prepare your dough: Roll out your pasta dough to the desired thickness using a rolling pin or pasta maker.
2. Place the dough on the chitarra: Lay the sheet of pasta dough over the wires on the chitarra tool, ensuring that it covers all of them.
3. Cut the pasta: Use a rolling pin to press down firmly on the dough, pressing it through the wires and cutting it into strands. Repeat this process until you’ve cut all of your pasta.
4. Dry your pasta: Let your freshly cut pasta dry for at least 30 minutes before cooking or storing.
Tips for Using a Chitarra Tool
To ensure that you get the best results when using a chitarra tool, keep these tips in mind:
1. Flour your dough: Before placing your pasta dough on the chitarra tool, dust it with flour to prevent sticking.
2. Don’t press too hard: Be careful not to press down too hard on the rolling pin when cutting your pasta, as this can cause the strands to break apart.
3. Clean your chitarra after use: After each use, wipe down your chitarra tool with a damp cloth to remove any leftover bits of dough or flour.
4. Experiment with different shapes: While a chitarra tool is traditionally used for cutting square or rectangular shapes, you can experiment with other shapes like triangles or diamonds to add visual interest to your dishes.
Conclusion
In conclusion, if you’re looking to take your homemade pasta game to the next level, investing in a chitarra tool is an excellent option. Not only does it provide consistent cuts and enhance texture and flavor, but it also saves time in busy kitchens. With our guide’s help, you’ll be using a chitarra tool like a pro in no time.
Wiki reference: https://en.wikipedia.org/wiki/Chitarra


