Are you tired of struggling to install your hollow wall anchors? Do you find it frustrating when they don’t stay in place, or worse, fall out altogether? Fear not, because we have the solution for you. Introducing the hollow wall anchor setting tool – the ultimate tool for easy installation and secure anchoring. With this guide, you’ll learn everything you need to know about using a hollow wall anchor setting tool and say goodbye to all your installation woes.
What is a Hollow Wall Anchor Setting Tool?
A hollow wall anchor setting tool is a specialized tool designed to assist in the installation of hollow wall anchors. These anchors are commonly used when installing items such as shelves, cabinets, and towel racks onto drywall or other hollow surfaces. Without a proper anchor, these items may eventually come loose or even fall off the wall.
A typical hollow wall anchor consists of a screw and an expandable metal sleeve that grips the inside of the wall as the screw is tightened. However, getting the sleeve to expand properly can be tricky without the right tools. That’s where the hollow wall anchor setting tool comes in – it helps to ensure that the sleeve expands evenly and fully, providing a secure anchor point for your item.
How Does a Hollow Wall Anchor Setting Tool Work?
The process of using a hollow wall anchor setting tool is relatively straightforward. Here’s how it works:
1. First, choose the appropriate size of hollow wall anchor for your project.
2. Next, use a drill to create a hole in the desired location on your drywall or other hollow surface.
3. Insert the hollow wall anchor into the hole until it is flush with the surface of the wall.
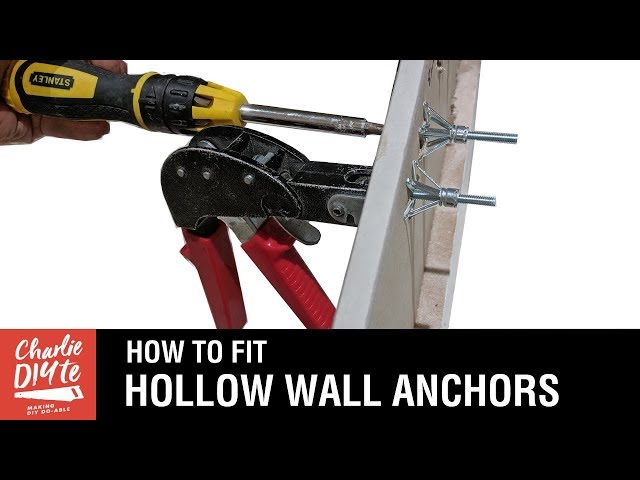
4. Place the setting tool over the head of the screw on your anchor.
5. Using a hammer or mallet, tap firmly on the end of the setting tool until you feel resistance.
6. Continue tapping until the sleeve of the anchor has fully expanded and is securely in place.
It’s important to note that you should never use excessive force when using a hollow wall anchor setting tool. This can cause damage to your wall and may even cause the anchor to fail. Instead, tap gently and steadily until the sleeve has fully expanded.
Benefits of Using a Hollow Wall Anchor Setting Tool
There are several benefits to using a hollow wall anchor setting tool for your installation projects. Here are just a few:
1. Easy Installation – With a hollow wall anchor setting tool, installing anchors becomes much easier and less frustrating. You’ll be able to achieve professional-level results with minimal effort.
2. Secure Anchoring – Using a setting tool ensures that the sleeve of your hollow wall anchor expands evenly and fully, providing a secure anchor point for your item.
3. Reduced Damage – When installing anchors without a setting tool, it’s easy to accidentally damage your drywall or other surfaces. A setting tool helps to prevent this by providing a controlled expansion of the metal sleeve.
4. Cost-Effective – By using a setting tool, you’ll be able to install items yourself without needing to hire a professional. This can save you money in the long run.
Tips for Using a Hollow Wall Anchor Setting Tool
Here are some tips to keep in mind when using a hollow wall anchor setting tool:
1. Choose the Right Size – Make sure you choose the appropriate size of hollow wall anchor for your project. If the anchor is too small, it may not provide enough support for your item. If it’s too large, it may not fit properly into the hole you’ve drilled.
2. Use Even Pressure – When tapping on the end of the setting tool, make sure you’re applying even pressure across its entire surface. This will help ensure that the sleeve expands evenly and doesn’t become misshapen.
3. Don’t Over-Tap – As mentioned earlier, it’s important to avoid using excessive force when tapping on the setting tool. If you hear a cracking or popping sound, stop immediately and try again with less force.
4. Consider Safety – Always wear appropriate safety gear such as eye protection when using power tools or hand tools.
5. Practice First – If you’re new to using a hollow wall anchor setting tool, consider practicing on a scrap piece of drywall or other material first. This will help you get a feel for how much force is necessary and prevent any mistakes on your actual installation.
Conclusion
Using a hollow wall anchor setting tool can make all the difference in your installation projects. It provides an easy and secure way to install items onto drywall or other hollow surfaces, without the frustration and potential damage that can come from doing it manually. By following the tips and techniques outlined in this guide, you’ll be able to achieve professional-level results with minimal effort.
References:
1. https://en.wikipedia.org/wiki/Hollow_wall_anchor
2. https://www.familyhandyman.com/project/how-to-install-drywall-anchors/
3. https://www.bobvila.com/articles/hollow-wall-anchor/