We have all passed through that point in our lives when making paper boats was a must do thing for a fun day. Over the years as you grow into the person you want to become, the craft does become vague and sometimes you might even forget it completely. Funny as it maybe, you might get a craving to make one once more or even get a nephew that wants you to teach them how to make one. Of course at this time you have no idea how to make a boat anymore. Therefore, you will definitely need to look for a source to learn how to make a boat. Look no further, in this article you will learn step by step how to make a boat just like a pro.
Related articles about how to make a paperboat
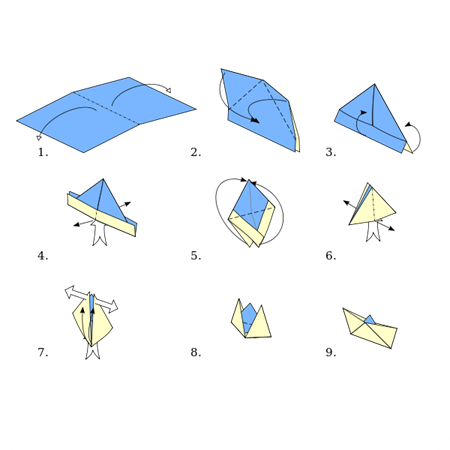
Step 1: First of all you need to get your hand on a normal piece of paper or even a printing paper. Take the paper and fold it on the shorter side so that it becomes folded in half. In some other cases this procedure is usually called the hot dog style.

Step 2
After the hot dog style, you can now take the paper and rotate it a 90 degrees angle. Then take the folded paper and fold it from the bottom to top along the long side of the paper. This is usually known as the hamburger style. This fold will create two creases in the center of the page. At this point you have to crease along both of the middles of the paper.
Step 3
Turn the paper so that you can face the fold. Fold the two corners while leaving some space at the bottom. Hold down the two top corners so that they line up with the crease in the middle. Use the previous made crease to line up the corners as well as creasing the edges to secure the folds.
Step 4
Turn the paper to a hat form. To do this you need to first fold the bottom of the paper against the two sides. After this take the top flap at the bottom of the paper and then fold it up against the bottom of the two folded triangles. After this, turn the paper and do the same thing to the flap on the on this other side.
Step 5
In this step you need to fold the bottom corners in. Take the edge of the rectangle and flap them backwards to from a triangle design. Do the same for the other side.
Step 6
In this step you need to turn the triangle you made into a square. All you need to do is simply pull the triangle from the inside and turn it outwards to form a square. Crease the edges to maintain the shape.
Step 7
In this case you need to fold up the bottom flaps to form a diamond like feature. Fold up the corners while ensuring that you align it to the top corner. Do the same for the other side.
Step 8
Fold the triangle into a square again just the previous step. Remember to crease the sides just the same way you did before to ensure the strong structure is maintained.
Step 9
This is actually the final step. Flap the square back to a mini triangle and observe the sides of the triangle you have formed. You will realize that the sides can be pulled outwards. Pull them out gently and see that it turns into a beautiful boat model.


