Do you love working with leather but find yourself struggling to achieve those clean, professional edges? Look no further than the leather edging tool! This simple yet versatile tool can make all the difference in achieving a polished finish on your leather projects. Read on for everything you need to know about choosing and using a leather edging tool.
What is a Leather Edging Tool?
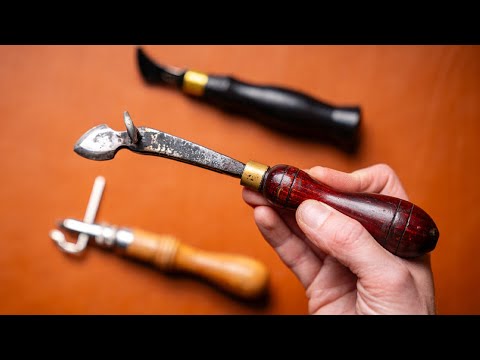
A leather edging tool, also known as an edge beveler or edge creaser, is a hand-held tool used to smooth and shape the edges of leather. It typically consists of a blade that cuts away excess material from the edge of the leather, creating a beveled or rounded edge. Some edging tools also have additional features such as creasing blades or burnishing tips for finishing touches.
Why Use a Leather Edging Tool?
There are several reasons why using a leather edging tool can greatly improve your leatherworking results:
1. Professional Finish: A well-edged piece of leather looks more polished and professional than one with rough or uneven edges.
2. Durability: By removing excess material from the edges, you reduce the chances of them fraying or wearing down over time.
3. Comfort: Smoothed edges are less likely to irritate your skin or catch on clothing or other objects.
Choosing the Right Leather Edging Tool
When it comes to choosing a leather edging tool, there are several factors to consider:
1. Blade Size: The size of the blade will determine how much material is removed from the edge of the leather at once. Generally, larger blades are better suited for thicker leathers while smaller blades work well on thinner materials.
2. Bevel Angle: The angle at which the blade cuts into the leather will determine the shape of the finished edge. Most edging tools come with interchangeable blades of different angles to give you more control over the final result.
3. Handle Comfort: Since you’ll be holding the tool for extended periods of time, it’s important to choose one with a comfortable grip that won’t cause hand fatigue or blisters.
Using a Leather Edging Tool
Now that you’ve chosen your leather edging tool, it’s time to put it into action! Here are some tips for using your new tool:
1. Prepare Your Leather: Before using the edging tool, make sure your leather is clean and dry. You may also want to use a leather conditioner to soften the edges and make them easier to work with.
2. Practice on Scrap Leather: If you’re new to using an edging tool, it’s a good idea to practice on scrap leather first to get a feel for how much pressure to apply and how quickly to move the blade.
3. Use Light Pressure: It’s better to go over the edge several times with light pressure than to try and remove too much material at once. This will prevent damaging the leather or creating uneven edges.
4. Work in Sections: Focus on one section of the edge at a time, rather than trying to do the entire piece at once. This will help you maintain consistency throughout the project.
5. Finish with Burnishing: Once you’ve edged all the way around your leather piece, use a burnishing tool or other finishing technique to smooth out any remaining roughness and create a polished shine.
Conclusion
A leather edging tool is a simple yet essential tool for any serious leatherworker. By choosing the right tool and using it correctly, you can achieve smooth, professional-looking edges on all your leather projects. Whether you’re making belts, wallets, or bags, an edging tool is sure to become one of your go-to tools in no time.
Wiki Reference
For more information on working with leather and other related topics, check out the following resources:
– Leatherworking on Wikipedia
– Tandy Leather: Tips and Tricks for Working with Leather
– The Art of Manliness: How to Make a Leather Belt


